Monday, September 12, 2011
Monday, April 27, 2009
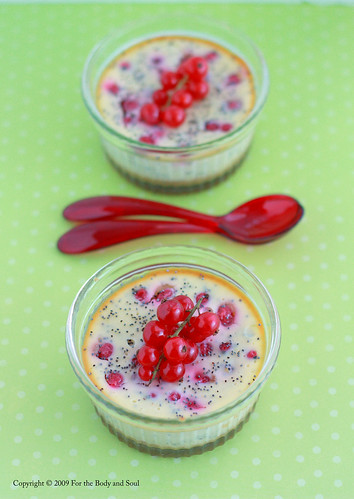
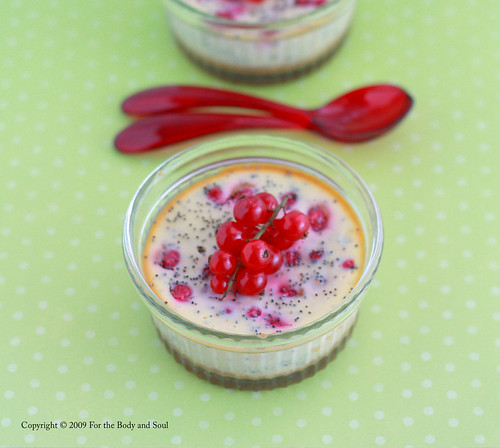
Daring Bakers: Red Currant and Poppy Seed Individual Cheesecakes
The April 2009 challenge is hosted by Jenny from Jenny Bakes. She has chosen Abbey's Infamous Cheesecake as the challenge.
I was actually surprised how much freedom we were given with this challenge. Jenny has given us a basic cheesecake recipe and let us be as creative with it as we wish. How fun was that!!!
I've opted for red currant cheesecake for a simple reason. Red currants which are almost never available here, suddenly and unexpectedly appeared in my grocery store and I just couldn't resist them.
I didn’t have enough currants to make the whole recipe, so I decided to scale it and make only 1/3 of it. Also, I decided to add some poppy seeds to the batter, they didn’t taste much, but were a really nice complement to the red currants. For the crust, I opted for amaretti cookies, which gave the cheesecake some extra flavour that went really well with the red currants.
I really enjoyed my first challenge and cannot wait to see the next one. Thank you for the recipe Jenny. It was truly delicious!!!

Here's my recipe, for the original basic cheesecake recipe check Jenny's blog here.
Red Currant and Poppy Seed Individual Cheesecakes
Makes 4-5 individual cheesecakes
For the crust:
60 g amaretti cookies
40 g butter, melted
1/2 teaspoon sugar
For the cheesecake:
200 g cream cheese
70 g sugar
1 large egg
1/3 cup heavy cream
1 teaspoon lemon juice
2 teaspoon poppy seeds
50 g red currants
1. Preheat the oven to 175 °C (350 °F).
2. Crush the amaretti cookies in a food processor. Mix with melted butter and sugar and press into the ramekins or custard cups.
3. Using an electric mixer beat the cheese and sugar until smooth.
4. Beat in the egg mixing constantly until well combined.
5. Pour in the cream and lemon juice and mix until smooth and creamy.
6. Pour the batter into the ramekins. Place the ramekins in a large baking dish filling the dish with boiling water until halfway up the side of the ramekins.
7. Bake for about 20-25 minutes or until the cheesecakes are solid around the edges but still jiggle a little in the center.
8. Cool in the oven with the door ajar for 1 hour.
9. Remove from the oven and leave to cool completely. Once the cheesecakes are cold, chill in the fridge overnight.
Tuesday, March 31, 2009
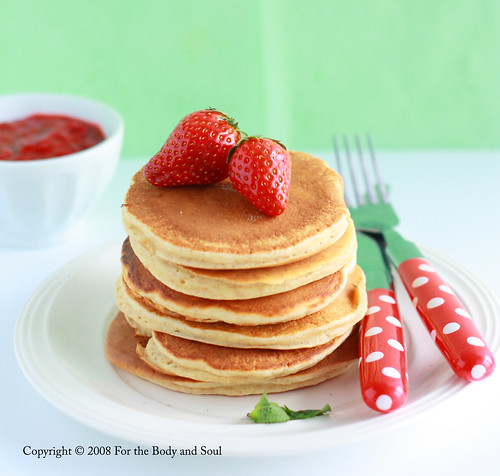
Taste & Create: Whole Wheat Pancakes with Strawberry Sauce
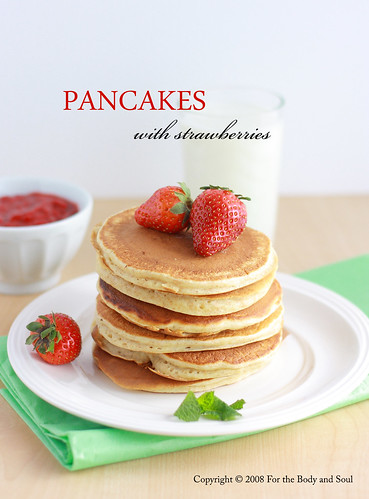
It’s hard to believe, but it’s been almost one year since I participated in Taste and Create last time. Taste and Create is a monthly food blog event organized by Nicole from For the Love of Food blog. The participants of the event are paired together and have to try a recipe from each other's blogs. This time my partner was Natalie from Oven Love food blog. Natalie made my corn soup, while I opted for her delicious whole-wheat pancake recipe. I’ve never had American pancakes before, so when I saw the recipe on Natalie's blog, I thought it’s a perfect occasion to finally try them. They looked amazingly tasty, and seemed more healthy than most of the pancake recipes I’ve seen so far.
Whole Wheat Pancakes with Strawberry Sauce
Makes 12-14 pancakes
FOR THE PANCAKES:
¾ cup all-purpose flour
¾ cup whole-wheat flour
1 ½ teaspoon baking powder
½ teaspoon baking soda
¼ teaspoon salt
2 large eggs
¾ cup skimmed milk
1 cup buttermilk
1 tbsp honey
¼ teaspoon vanilla extract
srtawberry sauce, maple syrup or honey to serve
FOR THE STRAWBERRY SAUCE:
4 cups frozen strawberries, thawed
1 teaspoon fresh lemon juice
2 tbsp maple syrup
TO MAKE THE PANCAKES:
1. Mix together the flours, baking powder, baking soda, and salt.
2. In another bowl, beat together the eggs, milk, buttermilk, honey, and vanilla extract.
3. Preheat a large nonstick griddle or skillet over a medium-low flame.
4. Pour the wet ingredients into the bowl with dry ingredients. Mix
only enough to combine them. The batter should remain lumpy.
5. Use a 1/4-cup measuring cup to ladle the batter onto the griddle or skillet.
6. Cook over medium heat until small bubbles appear on the surface of each pancake, then turn and cook until golden brown.
7. Serve warm with the strawberry sauce and maple syrup or honey.
TO MAKE THE STRAWBERRY SAUCE:
1. Using a food processor, process the strawberries into chunky puree.
2. Place together with the lemon juice in a small saucepan. Heat over low heat until warm.
3. Stir in the maple syrup.
Recipe adapted from The Food You Crave: Luscious Recipes for a Healthy Life by Ellie Krieger

Wednesday, March 18, 2009
Magdalenas

Today’s recipe is my entry for Sugar High Fridays, a monthly food blog event started by Jennifer from The Domestic Goddess food blog . This month the event has been hosted by the owner of In My Box food blog. The task was to prepare a dessert that is at least 100 years old.
I’ve been planning to make magdalenas for a while, so when I’ve learned that these little Spanish cakes have been actually baked since the Middle Ages I decided to give them a try.
Magdalenas are little sponge cakes somehow similar to French madeleines. They’re incredibly soft and moist inside, and a little bit crunchy outside. What makes them different from French madeleines is their shape - French madeleines are baked in pans with shell-shaped depressions, while the Spanish magdalenas use mini muffin pan. Unlike the French madeleines which are made with real butter, original Spanish magdalena recipes use olive oil.
Even though some modern recipes replace the olive oil with margarine or butter, sometimes also adding some milk to the batter, I opted for the original olive oil version. Searching through Spanish food sites, I found a few similar recipes which used an equal weight of olive oil, flour, sugar and eggs, often with a hint of lemon. The only difference between the recipes was actually the amount of baking powder. Some of the recipes used significant amounts, while other didn’t use baking powder at all. I decided to check whether the baking powder is really necessary here and made half of my magdalenas with and half without it. The result? To be honest, I didn’t notice any significant differences in the structure of the cakes, neither in their flavour. Also, all the magdalenas have risen the exact same high, although the ones with baking powder were ready a few minutes earlier.
As for the olive oil flavour, well, it’s palatable, but totally dominated by a wonderful lemon flavour, so no need to worry about that. And, if you really can’t stand a little bit of olive oil flavour, you can always use sunflower oil instead. Also, if you don’t have mini muffin pan, regular muffin pan will work as well.

Magdalenas
Makes about 36 little cakes
250 g olive oil (or sunflower oil)
250 g eggs*
250 g pastry flour or all-purpose flour
250 g sugar
lemon zest grated of one large lemon
1. Preheat the oven to 180 °C (350 ° F). Grease or line mini muffin pan.
2. Whisk the eggs. Gradually add the sugar whisking constantly until you obtain smooth batter.
3. Continue whisking, gradually pouring the olive oil in.
4. Fold in lemon zest and sifted flour.
5. Spoon into prepared muffin pan.
6. Bake for 20 to 35 minutes (the time will vary depending on the size of pan you're using).
* you'll need about 4 extra large eggs in this recipe. Weight the eggs with their shells.
Recipe in Polish/Przepis po polsku:
Hiszpańskie magdalenki
Saturday, March 14, 2009
Spinach and Ricotta Cannelloni
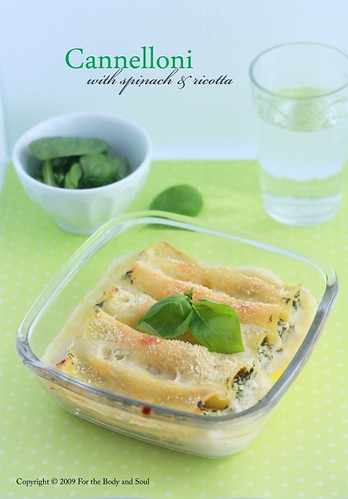
I like my cannelloni most with white wine sauce, but I know some people prefer tomato sauce. If you too decide to use tomato sauce instead of the wine sauce, add some water to it, as the pasta absorbs a lot of liquid while baking.
Spinach and Ricotta Cannelloni
Serves 4
1 package cannelloni pasta (you’ll need about 16 shells)
1 tbsp olive oil
2 garlic cloves, crushed or minced
300 g frozen spinach, thawed
400 g ricotta cheese
40 g (8 tbsp) Romano or Parmesan cheese, grated
salt
pepper
1 tbsp olive oil
2 garlic cloves, crushed or minced
300 g frozen spinach, thawed
400 g ricotta cheese
40 g (8 tbsp) Romano or Parmesan cheese, grated
salt
pepper
WHITE WINE SAUCE:
2 tbsp butter
2 tbsp flour
200 ml dry white wine
250 ml milk
salt
white pepper
2 tbsp butter
2 tbsp flour
200 ml dry white wine
250 ml milk
salt
white pepper
1. In a large pan heat the olive oil, add the garlic and cook for a few seconds. Add the spinach and cook for 2-3 minutes (if the spinach is not completely thawed this will take longer). Leave to cool slightly.
2. When the spinach is slightly cooled combine with 4 tbsp grated Romano or parmesan cheese and all the ricotta. Season with salt and pepper. Fill the cannelloni shells with the mixture (I spoon the mixture with a tiny dessert spoon, alternatively, you can use piping bag)
3. Preheat the oven to 180°C (350°F). In meantime prepare the sauce. Melt the butter and flour in a saucepan over low heat, stirring constantly until you have smooth paste. Add a little wine alternating with a little milk, stirring well after each addition. Continue until all the wine and milk has been used and the sauce starts to thicken. Stir constantly. Season with salt and white pepper.
4. Pour half of the sauce into a large baking dish, arrange the cannelloni in a single layer over the sauce, cover with the rest of the sauce, sprinkle with the remaining Romano or parmesan. cheese. Bake for about 40 minutes or until tender.
Recipe in Polish/Przepis po polsku:
Monday, March 2, 2009
Smoked Salmon, Leek and Goat's Cheese Quiche
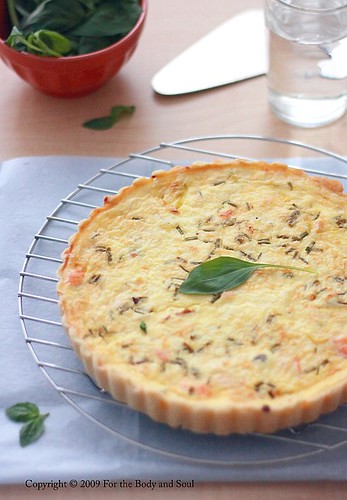
Let me start by saying that quiche isn’t a common dish in Poland. The first time I ate quiche as a teenager on a school trip to London. I didn’t know what exactly a quiche was at that time, and, to be honest, I thought that it must have been English rather than French dish. Shouldn’t they serve us English food on a trip to England after all?
I truly discovered the whole concept of quiche only later in Quebec. I was surprised how easy and quick it is to make. All you need is a pastry crust, eggs , cream (or milk) and filling of your choice: bacon in case of famous quiche Lorraire, or other fillings such as fish, veggies, herbs... whatever you like.

In today’s recipe I used smoked salmon, leek, goat's cheese and a little bit of chives. The goat cheese flavour was subtle, yet palatable and it paired very well with the salmon. The addition of chives made the quiche taste light and refreshing. It’s a wonderful dish on the day when you cook it, but also reheated in the oven next day. I suspect some of you might like it cold too- anyway, I do ;-)
Smoked Salmon, Leek and Goat's Cheese Quiche

FOR THE CRUST:
250 g all purpose or pastry flour, sifted
150 g cold butter, cut into cubes
4 tbsp iced water
pinch of salt
FOR THE FILLING:
200 g smoked salmon
1 leek (white part only)
1 tbsp olive oil
100 g soft goat cheese
1 cup (250 ml) milk (at least 2% fat)
3 extra large eggs
2 tbsp lemon juice
1 tbsp chives, chopped
salt
pepper
1. Place the flour, salt and butter in a food processor. Pulse until the mixture looks crumbly. While the motor is running, add water, spoon by spoon to form smooth dough. Transfer to a flat surface and knead slightly to form a ball.
2. Grease the tartlet pans with butter. Roll out the dough on a lightly floured surface. Line up the tartlet pan. Cover with a piece of parchment paper and fill with baking weights or uncooked peas or beans. Refrigerate for 30 minutes.
3. Preheat the oven to 390°F (200°C ). Bake the crust for 15-20 minutes, take out from the oven and remove the parchment paper and weights.
TO PREPARE THE FILLING:
1. Slice the leek. In a frying pan heat 1 tbsp olive oil, cook the leek until tender but not brown.
2. Cut the salmon into small pieces.
3. In a bowl beat slightly the eggs and milk. Add crumbled goat cheese and chives. Season with lemon juice, salt and pepper.
4. In a separate bowl combine pieces of salmon and leek. Arrange in the tart shell. Cover with the egg and milk mixture.
5. Bake for 30-35 minutes. Leave to cool for 5-10 minutes before unmolding so that the batter sets, then serve.

Sunday, February 22, 2009
White Chocolate and Vanilla Muffins

Those of you who read my post about Apple Muffins with Nutmeg and Cinnamon might remember I mentioned white chocolate muffins recipe back then. They were one of the first muffins I’ve ever made and, even though I tried lots of different muffin recipes since that time, they have remained my favourite. I love their delicate structure and wonderful white chocolate flavor perfectly balanced with the addition of the lemon peel to the batter. I had never baked anything with white chocolate before this recipe, so it actually made me discover how delicious white chocolate can be when used in baked goods. The original recipe for the muffins comes from : Le codron Bleu Home Collection: Muffins. The addition of vanilla to the batter as well as the icing are my own ideas. Enjoy!!!
White Chocolate and Vanilla Muffins
Makes 12
DRY INGREDIENTS:
380 g flour
2 teaspoons baking powder
pinch of salt
125 g caster sugar
200 g white chocolate
WET INGREDIENTS:
2 eggs
375 ml milk
1 teaspoon lemon peel
½ vanilla pod (reserve the other half for the icing)
160 g butter, melted
WHITE CHOCOLATE ICING:
200 g white chocolate, roughly chopped
2 tbsp olive oil
½ vanilla pod
1. Preheat the oven to 210°C (410°F). Grease or line muffin pan with paper muffin cups.
2. Sift all the dry ingredients except white chocolate into a large bowl.
3. Chop the chocolate roughly. Add to the dry ingredients.
4. Split half of the vanilla pod lengthways, scrape out the seeds.
5. In a small bowl, whisk together the eggs and milk. Add the lemon peel and vanilla seeds.
6. Pour the egg mixture and melted butter into the bowl with dry ingredients. Stir with a metal spoon to combine. Do not over mix!!!
7. Spoon into the muffin pan filling ¾ full.
8. Bake for 20 minutes or until toothpick inserted in a muffin comes out clean.
9. Let cool slightly before removing from the pan. Serve warm or cold with the white chocolate icing.
WHITE CHOCOLATE ICING:
Break the white chocolate bars into pieces. Melt with olive oil and vanilla seeds in a heatproof dish over a pan of simmering water. Spread over cooled muffins. Let the icing set slightly before serving.
Recipe in Polish/Przepis po polsku:
Muffinki z białą czekoladą
Subscribe to:
Posts (Atom)